
When I release a new version of jcabi-aspects, a Java open source library, to Maven Central, it takes 30 seconds of my time. Maybe even less. Recently, I released version 0.17.2. You can see how it all happened, in GitHub issue #80: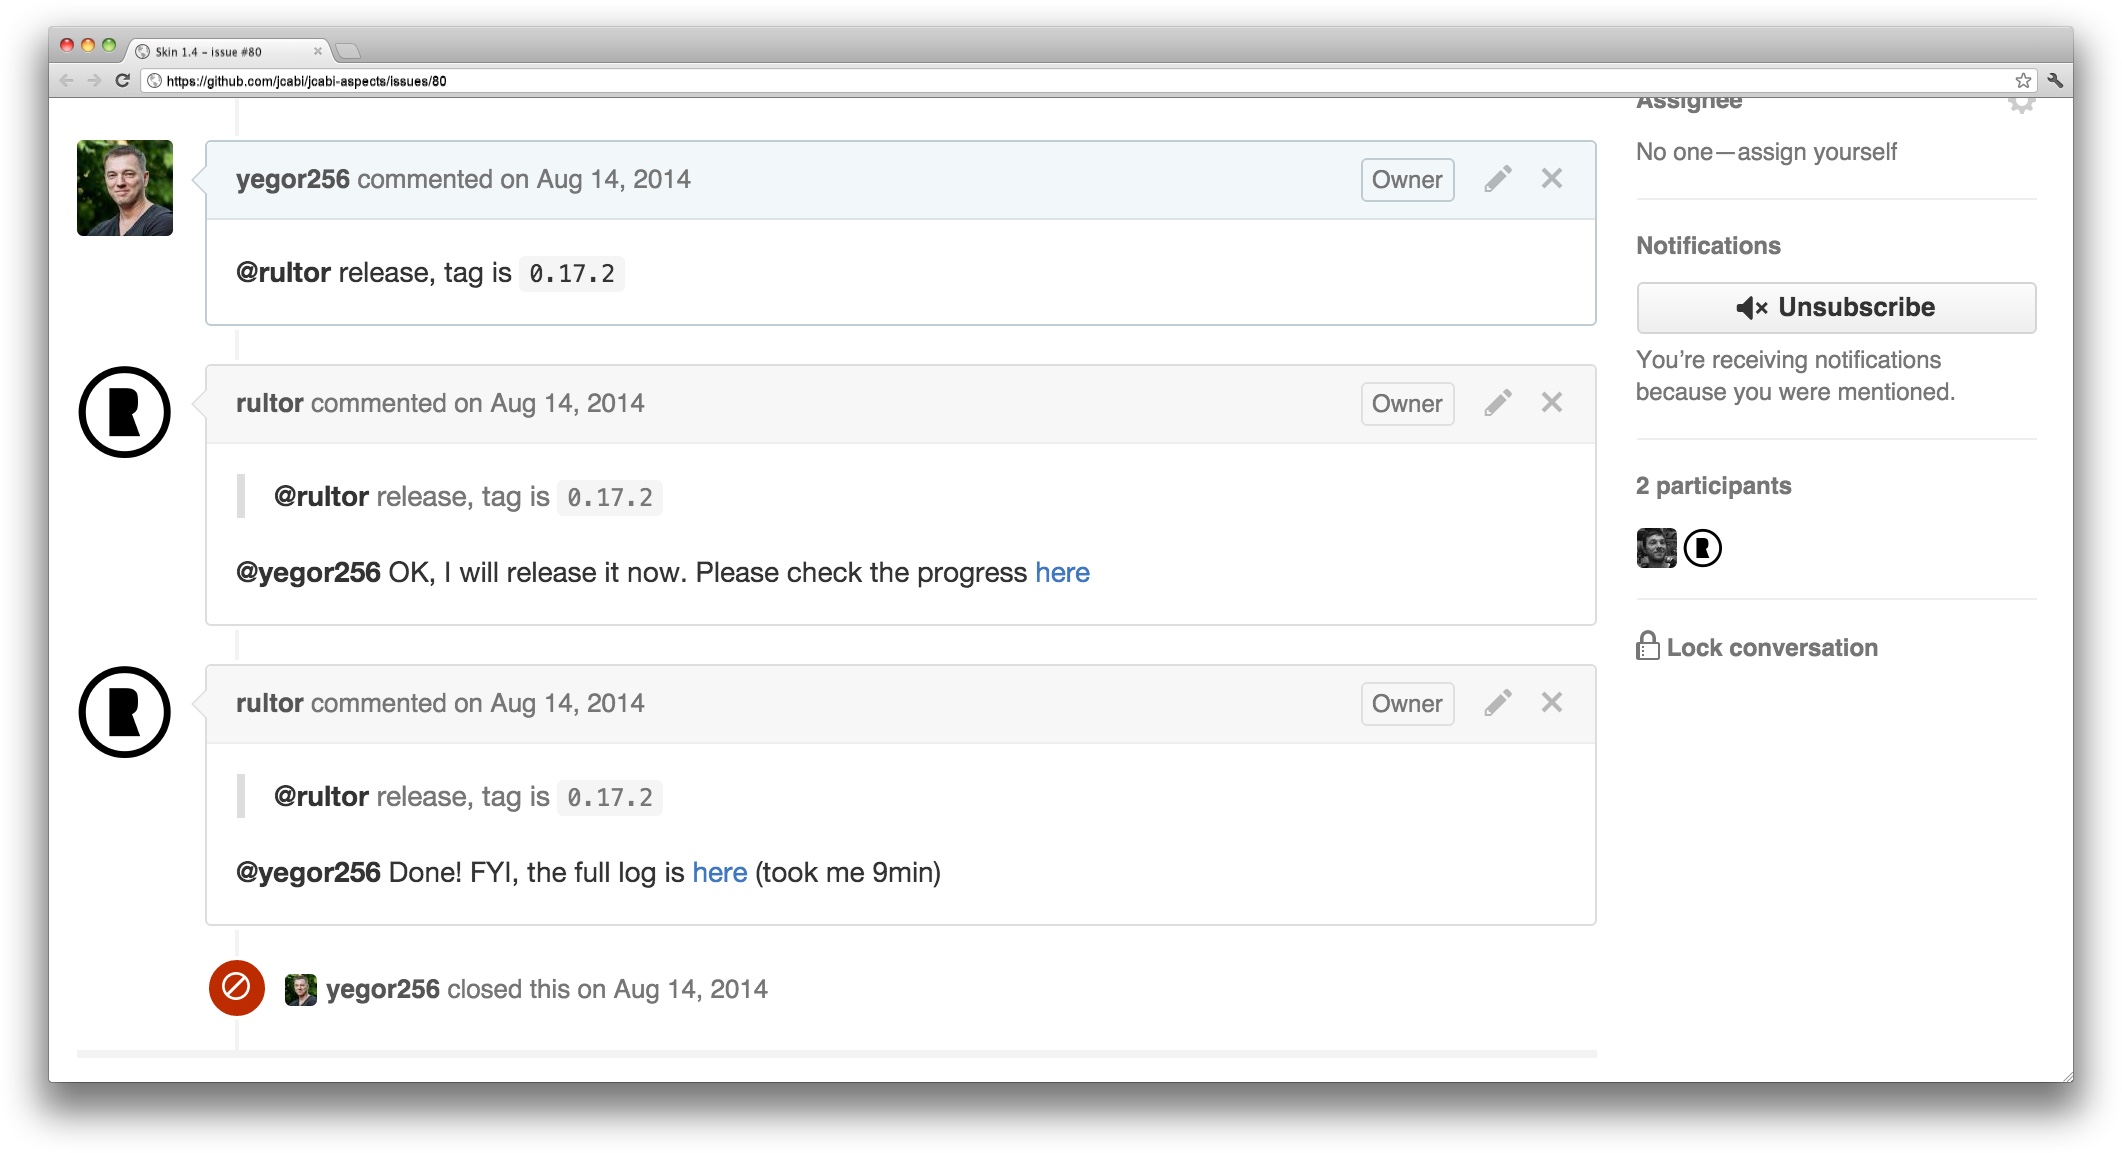
As you see, I gave a command to Rultor, and it released a new version to Maven central. I didn’t do anything else.
Now let’s see how you can do the same. How you can configure your project so that the release of its new version to Maven Central takes just a few seconds of your time.
By the way, I assume that you’re hosting your project in GitHub. If not, this entire tutorial won’t work. If you are still not in GitHub, I would strongly recommend moving there.
Prepare Your POM
Make sure your pom.xml contains all elements required by Sonatype, explained in Central Sync Requirements. We will deploy to Sonatype, and they will synchronize all JAR (and not only) artifacts to Maven Central.
Register a Project With Sonatype
Create an account in Sonatype JIRA and raise a ticket, asking to approve your groupId. This OSSRH Guide explains this step in more detail.
Create and Distribute a GPG Key
Create a GPG key and distribute it, as explained in this Working with PGP Signatures article.
When this step is done, you should have two files: pubring.gpg and secring.gpg.
Create settings.xml
Create settings.xml, next to the two .gpg files created in the previous step:
<settings>
  <profiles>
    <profile>
      <id>foo</id> <!-- give it the name of your project -->
      <properties>
        <gpg.homedir>/home/r</gpg.homedir>
        <gpg.keyname>9A105525</gpg.keyname>
        <gpg.passphrase>my-secret</gpg.passphrase>
      </properties>
    </profile>
  </profiles>
  <servers>
    <server>
      <id>oss.sonatype.org</id>
      <username><!-- Sonatype JIRA user name --></username>
      <password><!-- Sonatype JIRA pwd --></password>
    </server>
  </servers>
</settings>
In this example, 9A105525 is the ID of your public key, and my-secret is the pass phrase you have used while generating the keys.
Encrypt Security Assets
Now, encrypt these three files with a rultor remote:
$ gem install rultor
$ rultor encrypt -p me/test pubring.gpg
$ rultor encrypt -p me/test secring.gpg
$ rultor encrypt -p me/test settings.xml
Instead of me/test you should use the name of your GitHub project.
You will get three new files: pubring.gpg.asc, secring.gpg.asc and settings.xml.asc. Add them to the root directory of your project, commit and push. The files contain your secret information, but only the Rultor server can decrypt them.
Add Sonatype Repositories
I would recommend using jcabi-parent, as a parent pom for your project. This will make many further steps unnecessary. If you’re using jcabi-parent, skip this step.
However, if you don’t use jcabi-parent, you should add these two repositories to your pom.xml:
<project>
  [...]
  <distributionManagement>
    <repository>
      <id>oss.sonatype.org</id>
      <url>https://oss.sonatype.org/service/local/staging/deploy/maven2/</url>
    </repository>
    <snapshotRepository>
      <id>oss.sonatype.org</id>
      <url>https://oss.sonatype.org/content/repositories/snapshots</url>
    </snapshotRepository>
  </distributionManagement>
</project>
Configure GPG Plugin
Again, I’d recommend using jcabi-parent, which configures this plugin automatically. If you’re using it, skip this step.
Otherwise, add this plugin to your pom.xml:
<project>
  [..]
  <build>
    [..]
    <plugins>
      [..]
      <plugin>
        <artifactId>maven-gpg-plugin</artifactId>
        <version>1.5</version>
        <executions>
          <execution>
            <id>sign-artifacts</id>
            <phase>verify</phase>
            <goals>
              <goal>sign</goal>
            </goals>
          </execution>
        </executions>
      </plugin>
    </plugins>
  </build>
</project>
Configure Versions Plugin
Once again, I recommend using https://parent.jcabi.com. It configures all required plugins out-of-the-box. If you’re using it, skip this step.
Otherwise, add this plugin to your pom.xml:
<project>
  [..]
  <build>
    [..]
    <plugins>
      [..]
      <plugin>
        <groupId>org.codehaus.mojo</groupId>
        <artifactId>versions-maven-plugin</artifactId>
        <version>2.1</version>
        <configuration>
          <generateBackupPoms>false</generateBackupPoms>
        </configuration>
      </plugin>
    </plugins>
  </build>
</project>
Configure Sonatype Plugin
Yes, you’re right, https://parent.jcabi.com will help you here as well. If you’re using it, skip this step too.
Otherwise, add these four plugins to your pom.xml:
<project>
  [..]
  <build>
    [..]
    <plugins>
      [..]
      <plugin>
        <artifactId>maven-deploy-plugin</artifactId>
        <configuration>
          <skip>true</skip>
        </configuration>
      </plugin>
      <plugin>
        <artifactId>maven-source-plugin</artifactId>
        <executions>
          <execution>
            <id>package-sources</id>
            <goals>
              <goal>jar</goal>
            </goals>
          </execution>
        </executions>
      </plugin>
      <plugin>
        <artifactId>maven-javadoc-plugin</artifactId>
        <executions>
          <execution>
            <id>package-javadoc</id>
            <phase>package</phase>
            <goals>
              <goal>jar</goal>
            </goals>
          </execution>
        </executions>
      </plugin>
      <plugin>
        <groupId>org.sonatype.plugins</groupId>
        <artifactId>nexus-staging-maven-plugin</artifactId>
        <version>1.6</version>
        <extensions>true</extensions>
        <configuration>
          <serverId>oss.sonatype.org</serverId>
          <nexusUrl>https://oss.sonatype.org/</nexusUrl>
          <description>${project.version}</description>
        </configuration>
        <executions>
          <execution>
            <id>deploy-to-sonatype</id>
            <phase>deploy</phase>
            <goals>
              <goal>deploy</goal>
              <goal>release</goal>
            </goals>
          </execution>
        </executions>
      </plugin>
    </plugins>
  </build>
</project>
Create Rultor Configuration
Create a .rultor.yml file in the root directory of your project (reference page explains this format in details):
decrypt:
  settings.xml: "repo/settings.xml.asc"
  pubring.gpg: "repo/pubring.gpg.asc"
  secring.gpg: "repo/secring.gpg.asc"
release:
  script: |
    mvn -ntp versions:set "-DnewVersion=${tag}"
    git commit -am "${tag}"
    mvn clean deploy -Pjcabi --settings /home/r/settings.xml
You can compare your file with live Rultor configuration of jcabi-aspects.
Run It!
Now it’s time to see how it all works. Create a new ticket in the GitHub issue tracker, and post something like that into it (read more about Rultor commands):
@rultor release, tag is `0.1`
You will get a response in a few seconds. The rest will be done by Rultor.
Enjoy!
BTW, if something doesn’t work as I’ve explained, don’t hesitate to submit a ticket to Rultor issue tracker. I will try to help you.
Yeah, forgot to mention, Rultor is also doing two important things. First, it creates a GitHub release with a proper description. Second, it posts a tweet about the release, which you can retweet, to make an announcement to your followers. Both features are very convenient for me. For example:
DynamoDB Local Maven Plugin, 0.7.1 released https://t.co/C3KULouuKS
---rultor.com (@rultors) August 19, 2014